• Winged dog mold

    With the rubber portion completed, now is the time to start on the plaster support shell, herewith is the photo of the first section of the shell hand-formed in place. While this hardens up I need to shovel snow off my driveway unfortunately, but about the time I finish that it will be time to form the next section.


    Now with the first 2 sections done it’s time to add the rest needed for what will become a 12 piece shell. All the small pieces are required to deal with the multitude of deep undercuts and opposing surface angles. The smaller pieces also make it easier to dismantle and assemble:

    PICT3045-sm

    Now with the mold removed from the original clay model it is set up and ready to cast a test interior cast-stone cast from.

    PICT3049sm

  • Butterfly child and winged dog mold continued

    I was able to spend some time working on this today while making the mold of the seated gargoyle.

    The butterfly photo doesn’t show a lot of difference from the one taken yesterday in the previous post, but that’s because the image sie is reduced and the small details are not easy to see. I spent the time working on cleaning up the border, wings, antennae, ribbons and hair, mostly refining, sharpening, straightening and smoothing as needed.

    Next session I will be working on the flowers and face, either-or,  or both, there’s a lot of petals that all have to be smoothed, refined and sharpened!


    PICT3042sm


    The winged dog mold is in progress, I had to take him off the stand and stand him up on the floor in order to reach into the areas behind the head and wings with the mold rubber. There’s several more applications of it to go yet.


    PICT3041sm


  • Mulcaster building “butterfly child” model

    A new client in Delaware purchased the first public cast of this panel which due to various other projects was not completed in Sept as I had planned!

    I really do need to get this model done as the clay does dry out even when kept moist and under plastic wrapping, especially now that the furnace is active and my modelling studio room  warms up fast when it kicks on since the room is small and there’s a good sized register in the wall near the modelling table that blows the hot air out pretty good.

    So here we have the current view of the panel, I’ll be working on this this weekend between the seated gargoyle mold and anything else that  might happen along this week!

    It won’t take a whole lot to get this finished now really, mostly I need to define and refine the flowers and details, and detail the face.

    PICT3040sm

  • WInged dog Nr 90 mold

    Now the mold itself has been started, I had to order another two gallon kit of my usual compound as I determined the one two gallon kid I had ordered was not going to be quite enough, and ratehr than trying to stretch it I decided to go ahead earlier in the week to order another kit and that arrived yesterday. That’s $215 each with the shipping so  the decision to use a second kit is not made lightly since it doubles the costs for the mold which may or may never see more than the one cast that a Nashville client ordered.

    PICT3039sm

    The first application of the compound does not have to cover every inch of the model, it’s use is mainly to fill in deep details, fine details, anything that has crevases or holes which can trap air pockets such as eyes and nostrils when applying an almost paste-like compound.

    Usually one application of the raw compound without the thickening chemical added is all that’s needed. In about an hour it will cure enough I can start building the thickness of the rubber compound up over the entire surface.


  • D5 Art Deco “conversion” continued

    Now that the plaster mold is mostly dry after two days in front of two box fans on “high” I decided to try pressing the first clay in it.
    It took about a half hour to carefully press the clay in, and it took about 35# of clay.
    I added the interior webbing that all of the architectural terracotta originals my work is based on- have for structural stength and integrity. My pieces don’t need the strength so much since they are not load bearing elements meant to support three stories of brickwork above them, so the webbing and wall thickness is between 5/8″ and 1″ thick, while the antique originals were typically specified to be 1-1/4″ to 1-1/2″ thick.

    Here’s a view of the back, I think in about  a couple of hours it should be firm enough from the plaster mold absorbing moisture from the clay that it will be firm enough to at least remove the sides of the mold. To remove the clay pressing it will have to stiffen further enough to support it’s own weight.

    PICT3037sm

    I’m pleased to see that the first pressed clay came out better than expected, only a little minor defects need touching up, here’s a photo of it fresh out of the plaster mold, because it’s late I’ve wrapped it in plastic to mess with tomorrow night.

    About 3 hours later… I wound up simply standing the mold on edge, taking the band off, carefully removing the two sides and top and then removing the large base section leaving the clay model resting on it’s bottom side on the bottom plaster section. Then I placed a plywood sheet with 3 strips of plywood against the clay models’ back and just tilted the whole thing horizontally to leave the clay model supported on the 3 strips on the plywood. The strips act as spacers to allow air to circulate inside as it dries.

    PICT3038sm

    I’m guessing a half hour or so of “cleanup” and re-detailing touchup will be what it takes, the small defects are mostly where one bit of pressed clay merged against another leaving a very tiny “line” or wrinkle. Some of that might be controllable by technique, or it might just be the nature of the beast with pressing clay- as you work some of the clay starts to dry and the edge of that leaves a little line when more damp clay is pressed next to it, something like that seems likely.
    The main defects can be seen on the upper left part of the smooth “V” and on the bottom edge where the face met the side, that 90 degree edge has some “lines” or wrinkles where the very surface of the clay didn’t quite merge 100%

    It took about a half hour to press the clay, it could take a couple of weeks to dry out slowly.

  • Seated winged dog

    Now I have the original clay model set up on a board to begin the mold making process.

  • D5 Art Deco “conversion” continued.

    Today I am working on the plaster piece mold for this panel, the photo shows the previously pictured rubber positive now set up into a wood form for pouring the plaster piece mold. With this first photo two of the five sections required have been poured after putting in temporary clay blocking walls in the other two side sections I don’t want filled with plaster just yet.

    These two sections have to set first, and then they get completely soaped in situ and the soap allowed to dry before the next two sections are poured- in this case what is the top and bottom sides.

    And then the progressive sequence with the remaining two sides:

    The last section poured, which is the largest piece and which forms the base/bottom of the mold the four sides fit onto:

    The completed plaster piece mold assembled after cleaning up sharp edges is now set aside to dry out before being used. The design can be seen is in reverse (negative), with the inscribed lines on the casts seen here as raised lines. Just like a film negative has the colors reversed and the image reversed, the mold does as well.

    When the plaster mold is dry, then the fun begins with the labor of hand-pressing, ramming and compacting the red clay firmly into every milimeter of the inside of the mold, and building it up to about a 5/8″ thickness in the surface and sides. Also for additional strength and stability- additional walls or webs are formed by hand  inside to divide up the large opening into about six small compartments just like the original architectural pieces have. The backs of these closely resembles the two compartments that concrete blocks have.

    The webbing adds structural strength as well as helps prevent warpage, on buidling facades it also allows keying-in of bricks and mortar so it’s all locked firmly into the wall.


  • Seated winged dog

    This model was completed in 2007, the design is after an extant terracotta sculpture on the  gothic inspired landmark  by famed architect Cass Gilbert at 90 West Street, NYC. The building sits across from the WTC site and when the twin towers collapsed in 2001 some of the falling steel and debris caused considerable damage to the North facade of 90 West Street.The building was actually under renovation when the 9/11 collapse happened.

    This  damage was in addition to the raging fires that went on for days in 90 West, but the building was not destroyed because when it was built in 1907-  over 100 years ago- the standard practice of the day in tall buildings especially was using hollow terracotta blocks for all walls and partition walls, as well as making up part of the floors. Today, such walls are typically either made from cheap mass-produced concrete block, or plasterboard. Concrete block is very soft, heat destroys concrete, plasterboard has little to no fire resistance at all. Terracotta blocks were made in a kiln originally, and were brought up to around 2,000 degrees F or more, thus, an ordinary wood, paper type structure fire is of little consequence to this material, that is the main reason the building survived.

    The then present owners were unable to handle the costs of repairing the new damage and sold it to the current owners for $12 million. The new owners embarked on a $145 million restoration to restore the building as it was, and convert it to residential units.

    The facade had to be completely removed, damaged terracotta units replaced with new ones, and the damaged stone replaced, and the whole North loor of this 25 story building, installed in  little niche-like  canopied cutaways,  and their backs engaged into the terracotta block wall behind them.

    The buildings’ top  8 or 10 floors are a veritable wedding cake of ornament featuring griffins and winged lions seated on pedistals, owls, gnome-like creatures, floral and vine ornaments, finials, crockets and capitals all capped with a copper mansard roof which itself was capped by finials.

    90 West Street, 1907

    90westmodMy original clay model from 2007

    A client expressed interest in this design for a renovation  project in Nashville, so now this is in process for making the mold next week, that will make this design available now almost exactly  7 years after it was finished in Nov 2007.

    If I were to do an updated version of this model sometime,  there’s only a few minor changes I would do, mostly on the head/muzzle, for now he is what he is.

    With the amount of work to cast these in concrete, and the weight, handling and all the rest I have priced these at $325 for the interior and $395 for concrete, plus shipping in a wood crate. It is unknown at the moment if this can be shipped Fedex ground or not, if it exceeds about 110# it will have to ship by truck as the added weight of the crate and packing will add about 45# and their weight limit is 150#.

  • New 1/12 scale room box

    I did a small amount of work on the plywood for the facade of my furniture store model today, it is 1/2″ thick veneer-core apple ply. I have cut out for the two display windows and the door/transom openings. There is a row of 6 square windows across which on the real building are semi-opaque textured glass that I think I will use clear glass for on this instead so the interior is more visible. The door opening will be set back inside a couple of inches. I have not decided how deep I will make the box yet, I intend to finish the facade completely and decide.

    This will be the second 1/12 scale model roombox I’ve done so far, the bricks I will be using are scale model bricks made from colored plaster, some of them will need to be run through a hold down form I made to run a router across to shape one corner of each. The router idea works ok and there is an acceptable percentage of loss from that process that might reduce a little as I develop a better technique.
    The fancier bricks run up both columns and across to form a raised decorative border frame, there is a similar rectangular frame up top which on the real building would have been a place for a large sign.

  • The finished pool model

    Colored concrete bas relief panel for the new city pool building to be inset into the exterior concrete block wall by the entrance. The design has been discussed in previous posts last summer, the techniques on the original clay model which was  my own design based around the drawings of the actual pool  and walkway layout. The design incorporates raised letters which were executed on the clay model using some novel-to-me but time proven techniques for creating raised letters in sculptures found in a 1930s era sculpture book.

    The book suggested that such raised letters were almost never hand formed individually in the clay as they simply cannot be easily modelled uniformly and exacting, or without a lot of time. The technique I used was based on the 1930s concepts but modified for my situation and methods, essentially I purchased the required commercially made wood  letters, made a quick rubber mold of them as a group, poured the letters in different formula mold rubber, and then cast a plaster mold of the group of rubber letters. The plaster mold was then used to hand-press clay into, once the clay letters firmed up a little and could be removed from the plaster mold they were afixed to the clay model in their appropriate spaced locations already lightly marked out.

    The end result was perfect, every 1/4″ raised letter neatly and evenly shaped and spaced.


  • Art Deco D5

    The rubber portion of the mold is almost completed, one additional application in about an hour will finish it, then it will cure overnight and I can build the plaster shell for it to-morrow.

    Once I have the shell done it can be taken apart and removed from the plaster master and I can cast a new plaster master to store away, once I do that I should be able to start making the positive rubber master mold.

    I can finish the rubber positive master mold but I don’t have any more molding plaster with which to make the plaster press-mold, either I’ll have to order a bag shipped UPS or wait until I order some regular cast stone and clay and have some bags added to the truck shipment. I think I’ll just bite the UPS cost on one bag so I can get it done sooner than later.

    PICT3013

    Now with the new mold completed (above) I have begun the next step- making a positive/reverse mold of the inside of this negative mold.

    With the positive/reverse mold rubber applied to the inside of the first mold, it is now filled with plaster for the supporting shell, both the plaster and the rubber now set aside for a few hours for the rubber to cure (below)

    About 5 hours later with the rubber cured a little faster than otherwise due to the heat of the setting plaster, the first mold is removed leaving the positive/reverse mold with it’s plaster inside supporting shell (below)

    Now I have to wait on getting some molding plaster for the next step- making the 5 piece plaster mold of this, 4 side sections and the flat face section which will be used to press the clay into once that is fully dry.

  • Art Deco D5

    I have my master plaster cast taken from the original mold made from my hand-modelled 2007 clay master laid out on a board to prep for the new mold.

    I needed to do a little bit of repairs to the sides on this first, unfortunately the original clay model was fired in the kiln a year ago and for some reason I had not taken a plaster master cast from the first rubber mold immediately when it was made as is typical.

    That was probably because I had the original clay model, but later forgot I didn’t also have a plaster master and I fired the clay, as a result the original clay model is about 5% smaller from being fired and I don’t want to re-mold that since it is smaller than the other two panels in the set- one of which was fired the other was damaged beyond salvage to fire it but has a plaster master stored away.

    The master cast being used now was taken from the first rubber mold made of the  compound I used to use that started to tear and shrink early on, as a result the sides were somewhat uneven.

    Fixing that now and the mold will start to-morrow, once I have the new mold I can make the second mold I need to have to get started on a plaster mold for pressing terracotta from.


  • Terra cotta

    I now have my kiln back in my home studio after removing it from the gallery basement which seemed like the ideal place for it at the time I bought it. So it’s set up now at home where it’s much more convienient to monitor.

    I fired a couple of older raw clay original models with complete success, including the Astor Place subway beaver model which was just 1/4″ less tall than the inside of the kiln with the lid closed.

    I’m considering “converting” the Art Deco D5 model into a terracotta line, here’s the original clay model that I fired in the kiln a year ago after making the rubber mold for casting it in interior cast-stone and concrete:


    In order to “convert” it to enable making them in fired pressed clay, I would have to make a positive cast in rubber and then make a 5 piece plaster mold of that positive rubber cast. The idea of the rubber positive is the rubber is soft and “gives” so that pulling a hard plaster shell mold off it, undercuts slide right out easily.

    Once I have the positive rubber I can make molds from that as needed, making one to start with. When the plaster mold is dry then the clay can be hand-pressed into it, allowed to stiffen slightly, removed, dried completely and then fired in the kiln.

    One thing with the “converting” is that  in the processes there is about a 5% shrinkage of the clay from wet to dry and another 5% shrinkgage during firing for a total of about 10% or 1″ loss per 10″ which on this panel will result in it being about 2″ less wide and maybe 1-1/4″ less tall.

    I think this fall/winter I’m going to do this.

    Actually, I decided to go ahead and order the $200 worth of mold rubber I need to make the replacement mold for this since the original mold rubber by Quantum Silicones that I used in 2007 to make the first mold turned out to be total  garbage. Hopefully this weekend if the rubber arrives before Friday I will have the master cast all set up and ready to mold Saturday.

    I should have enough left over from the two gallons added to the left-over rubber I have on hand to make the positive mold too- on Sunday if all goes well.

    At least with this I can get the process started, I don’t have any molding plaster on-hand to make the press-mold with though, and the regular cast stone is not suitable for this as it hardens up extremely hard and is not absorbant as the molding plaster is.

    I might just get a bag sent to me  UPS as I don’t want to order a pallet load of material right now.


  • Various

    I have  the Nashville clients’ project finished, with the last two crates shipping in the morning, and the city pool projects’ concrete panel finished as well.

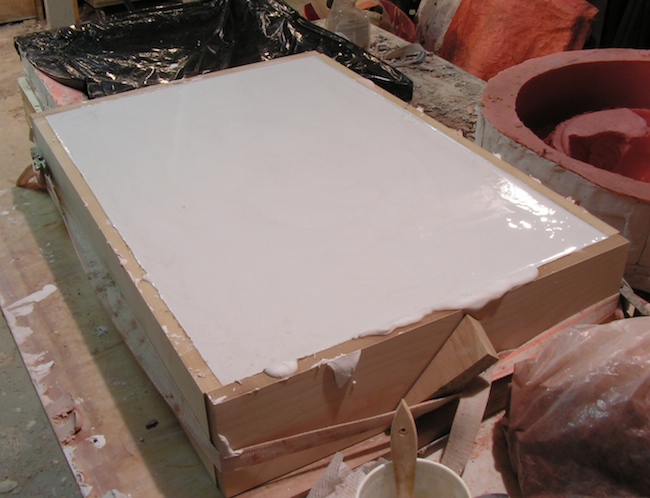
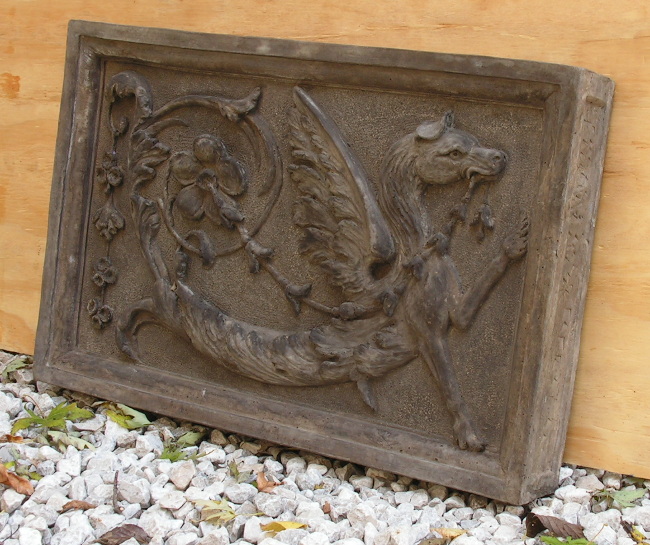
    The concrete pool panel turned out to be a major pain unlike any other! and to think, this is a donated sculpture and it was to be a simple matter to cast the concrete into the mold I made. After casting the first one there were two things I didn’t like, one was it had a lot of fair sized air bubble holes on the surface, the other was the acid stain I’ve used so well on many concrete casts absolutely looked all wrong for this bas relief- way too dark.

    Ok, so I decided to cast another one and use a different stain, same story there, lots of holes on the surface and the other stain didn’t look right either!

    So I cast a third one, this time I decided to nix the stain and go with an integral concrete color, but this one too despite my best concerted efforts also had a lot of holes in the surface! Concrete will always have some no matter what you do, but this went beyond the definition of “some.”

    So I re-examined the whole process to see what may have changed, then  I figured out there was only one thing I had changed from the usual and that was making use of my large powered concrete mixer to mix up the dry material. I thought about how that worked and realized it was almost certainly fluffing up the sand and Portland cement enough it was putting lots of air into it.

    So the 4th try I mixed the concrete up the normal way I have for years- by hand in a rubber tub, and I decided since panel #3 was not quite as red as I was hoping for, and that I had not used the maximum amount of color yet, that I would go ahead and add two bottles of it to the 12 quarts of water for the 150# of concrete to get it a little darker.

    The product can be used one bottle to 60# of concrete, I used one per 75# and kept it a little less than the maximum but more than the 1-1/2 bottles I used for #3.

    Now that it cured for a couple of days I took the cast out today and it came out good, a small amount of tiny air bubbles as normal/usual and certainly nothing like what I had with #1, 2 and 3. It looks like it will turn out to be a pleasant red terracotta color when it’s fully cured and dry.

    So now we know- stay away from any mechanical mixing of even the dry ingredients! I knew to stay away from mixing the wet concrete that way, but it never dawned on me mixing the dry ingredients would cause issues.


    Hopefully in a few days I can get a photo of the panel, meanwhile my right middle finger is feeling better, after having been banged a month or so ago and the nail turning black and blue, it was half replaced by the new nail when you guessed it- it was smashed again the other day wrestling the over 100# plaster mold for the pool cast down the  stairs, I lost my footing a bit and tipped towards the stone wall and of course that finger was the one that was between the mold and the stone wall and was half scraped along the rough stone and half smashed

    So here it was shortly after:

    As if that wasn’t enough torture for the week, while casting the concrete I wear rubber gloves, but this time I didn’t notice the left middle glove finger tore open and as I was moving my hands around the rubber tub mixing, the fingernail caught right up against a small bit of hardened concrete and broke a small piece of nail off.

    Just lovely, now both middle fingers are messed up for now!

    Hopefully next weekend I can get back to the Butterfly child/Mulcaster building model, I’ve not worked on it for a while and need to finish it, but right now the thought of having these two fingers in gritty wet clay is not a good idea.

  • R.S. project: Nashville

    A client who purchased an Art deco era theater and adjacent former store building recently contacted me for sculptures to install on the former store building. The one story brick facade of the store building was in very poor condition, enough that the facade had to be removed due to a bulge in the brickwork, and then be re-mortared back in place.

    The building’ name panel was preserved but the terracotta shield above it was cracked and missing a corner of it. It was decided to replace the broken shield with an Athena keystone (the nearby street names have a Greek theme, and there is a replica parthenon in Nashville as well) Also to be added was the Webster Hall griffin panel shown below in acid stained concrete being prepared for crating to ship:


    Athena is  pictured below: