I’ve often used the term “scaling” or “scaled” when referring to laying out the size of my models, I thought I would outline what this is exactly.
All this means is sizing something according to some reference point humans comprehend in normal day to day life, coming up with a comparison point of reference that can be relayed to other people and they instantly gain a mental picture of how large something is. This is why we see constant references in the media to descriptions such as “the boulder was as big as a Volkswagen,” the area of the fire was larger than a football field.”
In sculpture work we usually base scaling around the human body measurements, in my case I use a known averaged, rounded out standard size of bricks to figure out from photos just how large some keystone or sculpture on a facade of a building I never saw before is. For my purposes I round out the average size of normal bricks and assume them to be 2″ thick, 8″ long and 4″ wide and include mortar joints as a result of the rounding from fractions.
With that in mind let’s take a look at a sniplet from a facade;

I outlined one full brick in red and labeled it’s size for reference purposes, I also took the same size red outline and set it on vertically over four courses of bricks which also represents approximately 8″ in height.
With the next photo I added additional boxes and labels;
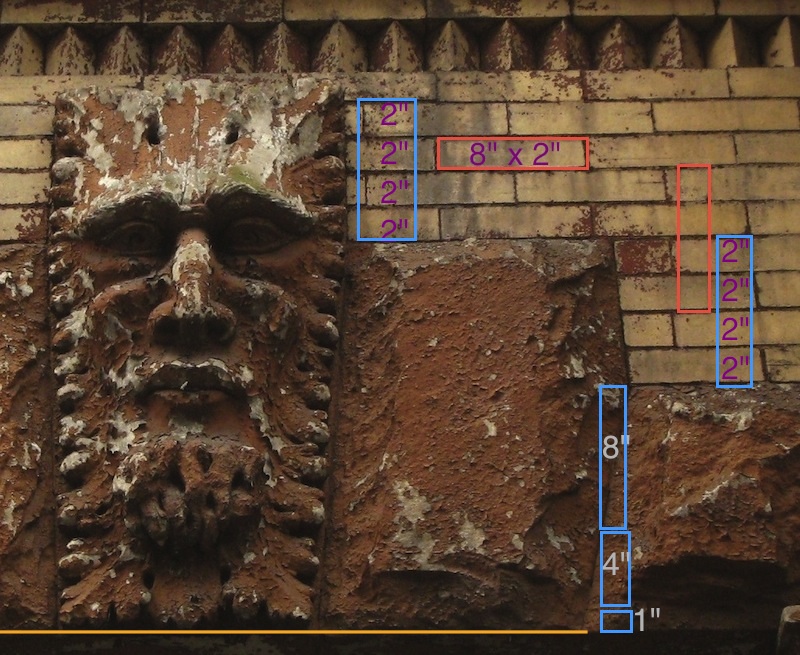
On this photo it is easy to see how each course of brick represents 2″ of height, starting at the top we see the keystone is about 8″ from the top of the adjacent stone to the top of the keystone itself, since the stone has no size we can go by, we must move over if possible to the next area of brickwork to use as the reference point, moving down we add another 8″ for the four additional courses of bricks. Now we run into no further nearby brickwork to use for the size reference, so we drag or otherwise copy the known and sized 8″ long blue box, and then add half again for 4 more inches and we see from the yellow straight line designating the bottom of the keystone that we are still a little short yet, so we add one more inch and that pretty well gets what we need.
Now, adding up the numbers we determine easily the keystone is close to 29″ tall give or take perhaps a half an inch.
The same method is used to figure the width at the top, and the width at the bottom, once those three figures are known, then the two angled sides when drawn will automatically be the correct angle too- the three measurements figure that out for us automatically.
One important issue with photos is, one will notice this image is distorted by the angle of view as we are looking both up and from the left towards the right, this creates a vanishing point distortion that would carry over to the right for quite a distance, however, this distortion is not a problem for this measurement method because we are using a known unit of size- the brick, and since each brick is mostly identical it doesn’t matter how distorted the image is as long as we can accurately count the number of units vertically and horizontally.
Where this distortion causes big trouble is is one were to try to decipher angles and curves based on what is showing in the image’s flattened view that gives the illusion of a third dimension. Shadows, blurring and the like can create confusion to the eye and the mind’s eye and the tendency is for the mind to often incorrectly “fill in” what is missing.
Further back in the blog I once had a couple of videos showing exactly how optical illusions can totally fool the eye of the artist and viewer into firm belief that what they are seeing is how the object really is, but when one rotates the view they discover with astonishment just how far off they really were, here’s a couple of screen shots showing one of the optical illusions, it appears all four ramps slope down here;

But when the cardboard assembly is rotated, you see not only don’t the four ramps slope down from the center they are not equi-distant N,S,E,W as the above fools the eye into thinking the ramps are;

This kind of phenomenon can be a big problem when using only one view of photos, having a frontal view AND a side profile view help nearly eliminate these issues, it still leaves minor issues but the worst are solved. In liew of having a second view, experience and knowlege of what was standard and expected can help replace the missing photo and information.