I did more work today on the eyes, eyebrows, cheeks and hair, I’m just now starting to like where it’s going.

Terracotta & Cast Stone Gargoyles, Keystones, Sullivanesque, Custom Commissions By Wolff
I did more work today on the eyes, eyebrows, cheeks and hair, I’m just now starting to like where it’s going.
I decided that since this model is so deep and heavy, I would rough hollow the back out, so I got it off the easel and standing vertically on the work bench so I could unscrew the backer board to access the inside.
I probably took out about 35# of clay from the back, it was a bag and a half worth.
With it being lighter I screwed the backer board back on and then laid him down flat so I could unscrew the bottom board to give the bottom a curvature. Once that was done I screwed the bottom board back on so it keeps the side baords stable and the model from sliding down from it’s own weight as I continue working on it.
For scale, the boards are 4-1/2″ wide.
From what I managed to learn, back in the days when these master models were made for building facades this 4″ or so portion of the back of the models were made from Plaster of Paris, and clay was modelled on top of the hard but still wet plaster and a mold made of the whole thing when it was completed. The plaster would have to be fresh/wet or soaked in water if it had been dry, otherwise it wouls suck the water out of the clay like a sponge and there would be some issues with shrinkage.
I’ve never done it that way but I can see how it has advantages, for one it absolutely sets the exact size and shape correctly, and when dealing with 100-150# of clay it is easy to distort the shape when it’s all solid clay, I’ve also not been able to get the perfectly straight sides and nice sharp corners they did by shaping the clay.
I can also see how it worked well to have a few standard forms since they would have to have been made in certain exact standard sizes within a limited range that was used.
I may try the 4-1/2″ deep plaster form on a future model.

I did quite a bit today on this, much of it reducing the cheeks, nose, changes to the eyes that include altering the style of iris, eyebrow changes and I decided to see how adding some hair under the hat will work figuring with so much of a beard he would have a lot of hair as well.
Think I’m liking it better now with these test changes.

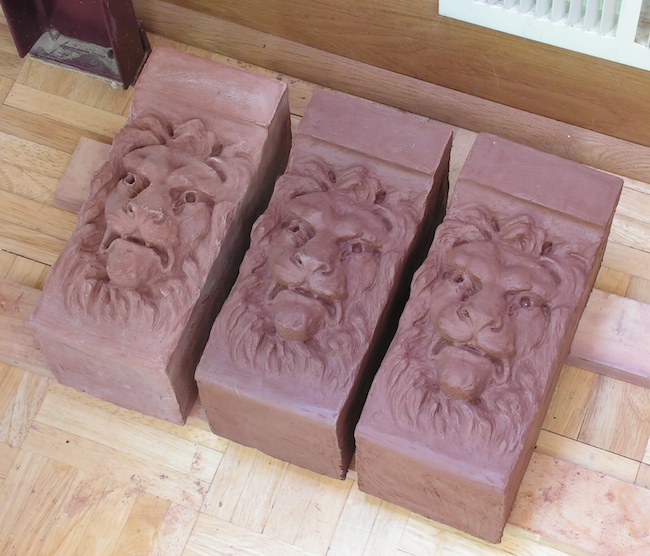
I made three of these before I set the mold aside for now, I really need to make a set of block molds of the five plaster sections before using the mold more because it’s the only mold I have since it was made directly off of the clay model.
Here’s a shot of the three pressed clay lions drying out, it’s easy to see how much the clay shrinks in the drying process by comparing the first one on the left with the most recent one on the right, the shrinkage is about 1/2″ to 5/8″ of it’s length.
Done with the model for tonight, I guess I spent about 3 hours so far on it, long way to go yet. I worked on the hat more, moved the eyes out a bit further.
The bottom is currently horizontal due to the form, but when the model is done mostly and firms up, I’ll be unscrewing the bottom board of the form and I have a template with a curve, the bottom of the sculpture gets a curve, concave with about a 1/2″ rise in the arc.

And now after a little more work, I stopped on this for tonight, I wound up moving the hat down about 1/2 or 3/4 of an inch. Still not sure on the eyebrows, the original stone has them but they are strange looking, the other stone that I still own does not have eyebrows at all defined. A lot of the old pieces didn’t have eyebrows actually defined and I’m not sure I like them as they are giving the face a sort of tragic, depressed expression.


Now that I have the half ton of clay I ordered I decided to start with this model scaled to compensate for two shrinkings of clay.
It’s inspired by a circa 1900 carved keystone I removed from a buidling facade around 1976.
I have the other one I removed and so I was able to get the exact size of the stone and depth of the face etc from it to work with.
I always called this one a cowboy due to the hat which years ago I thought suggested a cowboy hat, but it actually doesn’t seem to be, but is some kind of soft men’s hat with an odd brim and an odder obviously floppy top to it.
Due to the limitations of stone the “horns” of the hat were probably made thicker than the actual hat was.
I would guess that since most stone carvers of the era were immigrants from Europe, Italy, Germany, Russia, Poland etc., that the hat likely represents a style from “home” that was familiar to the carver, I’ve been unable to identify the hat so far, but I had been heretofore looking only in the 19th century American hat styles.
First roughout session:

The original stone:

The kiln reached final temperature just 11 minutes sooner than I estimated, I’ll open it up in the morning and see what I have.
Meanwhile, after finishing another plaster piece mold of a design I used to cast about 30 years ago, I pressed clay into it now and we’ll see how it turns out.
It took 10-1/2# of clay, the wall thickness of the clay is about 5/8″, and it is 10″ high, 4-1/4″ wide:

Now about 3 hours later I was able to remove the lion, here he is shown next to one of the cut down wall plaque versions:

The five pieces in the kiln all turned out just fine with the new schedule, the cherub was the problem before.

The still moist pressed lion block, I’ll need to clean him up a little and make another one today.

The program I came up with was 7 stages and started off with a 6 hour preheat @ 200 degrees F with a temperature rise of 60 degrees per hour, so it took about 2 hours to get to 200 degrees.
I had also placed the four lion blocks but not the cherub in the kitchen oven overnight @ 150-160 degrees.
Then it continued with segments 2 through 7:
S2- 80 deg/hour to 280 deg
S3- 100 deg/hour to 550 deg
S4- 80 deg/hour to 750 deg
S5- 150 deg/hour to 1100 deg
S6- 180 deg/hour to 1700 deg
S7- 80 deg/hour to 2060 deg with a 10 minute hold @ 2060 deg.
Total time: 24:20
The cherub blew out, th elions all came out perfect.
So I adjusted that for the next load which is already complete and should be cool enough to remove in the morning.
The change is:
Starting off with an 8 hour preheat @ 195 degrees F with a temperature rise of 60 degrees per hour, so it took about 2 hours to get to 195 degrees from room temperature.
Then it continued as before, with segments 2 through 7:
S2- 80 deg/hour to 280 deg
S3- 100 deg/hour to 550 deg
S4- 80 deg/hour to 750 deg
S5- 150 deg/hour to 1100 deg
S6- 180 deg/hour to 1700 deg
S7- 80 deg/hour to 2060 deg with a 10 minute hold @ 2060 deg.
Total time: 26:29
In addition, the four lion blocks and this time the cherub were all placed in the kitchen oven @ 150-160 degrees F for 10 hours before placing them in the kiln.
They should have been bone dry by all that, and if not, the 8 more hours @ 195 degrees should ensure it!
I was able to get the formula/factor to calculate the double clay shrinkage, so that issue is solved now.
I also have 1,000# of clay coming tomorrow so I can start work on the next model.
Meanwhile, I decided to make another design of mine into the clay-press format, it’s my old lion Nr.1265 which appears in my 1980 brochure as a wall plaque;

I decided to revert him back to the original design which was a block shape, this required hand-recreating the original form, casting a rubber positive in my current mold and then making a new plaster piece mold of it.
Here’s the rubber positive and the mold;

A small crop of the original circa 1895 terracotta and the building he came from some 35 years ago;

An overall view of 58 Norfolk St even shows the hole in the wall next to the window, I was able to remove a couple or three of these lions and two stone grotesques from the upper floor. This was a tricky building being directly next door to a synagogue where people could probably hear me hammering on the bricks at the abandoned 58 next door to them, one of the times I went in and came out with one of the little lions a patrol car slid right on over next to where I had my bicycle chained to a post across the street from the building, but I saw them coming quickly around the corner and somehow figured something was up, so I slid my cancas mailbag which had my hammer, crowbar, flashlight etc in it- under a nearby parked car.
Well, the officers got out and started to talk to me, best I can remember of this 1975 or so conversation is they asked me how come I ditched the bag of tools under the car as they dragged it out, I said something like I saw some kid down the block that gave me trouble before. Well the one officer was examining the little lion and standing in front of me turning it over in his hands and then he dropped it on my foot on purpose but pretended it was an accident (I knew better) it was pretty heavy, maybe 12# and it hurt but I covered it up pretty well.
Then they looked up at the building and asked “who put all those holes in the wall up there?” I said I didn’t know, that I found th elion in the rubble of the vacant lot next door.
Meanwhile the officer was still rolling the lion over in his hands looking at it and proclaming how heavy it was and dropped it on my foot a second time! He tried it a third time but I slid my foot out fast and it missed.
After asking me for my name and where I lived, I remember telling them fake ones, and the only address I could think of was hilariously enough the address of the Ricardo’s apartment in the 1950s sitcom; “I Love Lucy” 623 East 68th street.
After a bit they shoved the lion into my arms and told me to go. I got on my bike and started peddling north towards home, but as I went a couple of blocks I could see they were following me from a block back to see where I was going, so instead of turning West around Houston St to get home by Washington Sq Park, I continued north on to at least 14th St with them still behind me, so I continued on North as though I really was going to 68th St but they soon turned off as they hit the boundary of their precinct, I never went back to the building after that.

I’m going to have to figure out what the clay shrinkage actually is and allow for TWO shrinkings to wind up with the size I want to do pressed clay versions of my work.
I found the little cherub plaque really loses a lot of it’s visual impact due to the shrinkage. The original was 10″ wide and the fired terracotta is only 8-7/8″, that’s quite a reduction.
So the way it has to work now is making a clay model large enough to compensate for it’s own shrinkage plus the shrinkage of pressed clay copies of it, I’m not great at math enough to easily calculate what this will be per foot, here’s some measurements I do have:
Original: 10″
Shrinkage: 8-7/8″
Original: 9-1/2″
Shrinkage: 8-1/2″
Original: 4-5/8″
Shrinkage: 4-1/4″
Best I can come up with is the clay shrinks one inch on a 9-1/2″ original, so if I take 9-1/2″ and divide it into four it is 2-1/8″ which on a model that size would shrink 1/4″
Adding that to the 9-1/2 would be 11-5/8″ and 1-1/4″ shrinkage, I guess for my purposes then I can assume about 1-3/8″ per foot for shrinkage.
I would have to allow for two times that for a clay model plus the resulting pressed clay casts.
Here’s a design I want to do:
He measures 15″ high, 10-5/8″ wide at the top and 6-1/2″ at the bottom,
but none of those measurements are 12″ or multiples of it, so I really kind of need to know what the mathematical formula is to figure out that 1-3/8″ shrink over 12″ what it is on 15″ or any other non 12/24/36/48 measurement.
The 15″ is not too bad, as that’s 12″ plus one quarter of a foot ( 3″ )
so I can figure 1-3/8″ + 1/4 of that but that still doesn’t teach me the FORMULA to do it easier. I come up with 2-1/8″ shrinkage on 15″ but double that means I’d have to make the original model 15″ tall plus 4-1/4″ to compensate for the shrinkage to allow the fired pressed casts to end up just about 15″ tall!
In any case I managed with this one since 15″ is 1-1/4 feet so the measurements were not hard to come close to.
I made my box form 19-1/2″ high inside, and 13-3/8″ wide at the top, 8-1/8″ at the bottom, 4-1/2″ deep and screwed it together.
I have a curved template I used once before for the bottom of a keystone having a curvature for the top of an arched window, after I get the form filled with clay and levelled off 4-1/2″ thick, I take the bottom board off after laying the form flat on the bench, and then use the template to shape the clay, then reassemble the board and lean it back up on the easel to finish work on it.
The form depth is the portion of the sculpture that would/could be embedded into a brick wall, so when I make the plaster piece mold I’ll have to make the four sides in such a way that they are in 8 pieces, so 4 of them made about 3″ deep can be removed and the clay pressing cut with a wire so this backing portion behind the actual face is only an inch thick so it can hang on the wall.
This will be the first time I’ve done this but I already figured out the mold keys will have to be done so that the concave portions are on the backs of the narrower sides. The convex portions will have to be on the front edges of the 4 rear side pieces that get removed to make the casts thinner, that will avoid having “bumps” where the cutting wire would have to move flat against the mold.

Ive seen this years ago on West 12th street, the old St Vincent’s student nurses residence building, built in 1924 it features
two entrances with these roundels depicting a nurse’ portrait. As it turns out, they are almost exactly the same size as my wolf roundel and my tigress roundel- about 20″.
I really like this design, I may very well add it to my list of possible models to do.
By the time this building was built in 1924 the facades were starting to get plain and devoid of ornaments, this building’s only real attraction is the entrance, the upper floors are just plain bland brick, nothing exciting at all.

Photo by Beyond My Ken [GFDL (http://www.gnu.org/copyleft/fdl.html) or CC-BY-SA-3.0-2.5-2.0-1.0 (http://creativecommons.org/licenses/by-sa/3.0)]
I happened to find this for sale and bought it because he is exactly the same as a couple I had removed from a pair of buildings at 522-524 E 12th street in NYC way back around 1977. Even the mold number 1097-L is identical. These were usually installed with two other sculptures: a small lion keystone, and a larger keystone depicting Athena with a battle helm, 522 and 524 however lacked the little lion heads and instead used a smaller version of Athena on the top floor where the lions would normally appear.
These were selected out of a catalogue of sorts as these three sculptures can be found on a number of buildings around Manhattan installed together. The buildings date to the post 1900 “new law” tenement design and probably were all built around 1905.
Oddly enough one of the two I had in 1977 had an identical break on the top cornice, it could possibly even be one of the two I had or from the same building since I didn’t remove all of them, I didn’t remove all of them because as can be shown in photos below these sculptures were actually a supporting base for a column of bricks between the windows, the brick column was only about one brick wider than the sculpture which meant to remove it, I had to carefully do so and leave at least the few inches of bricks on either side to support the weight. Some idiot removed the two in the center between the two buildings and took out ALL of the supporting bricks which left the column just hanging in mid air only connected on the back by the perpendicular brick wall between the two buildings. A photo shows how the demolistion crew had to shore up the hole with heavy timbers to prevent collapse of that large section of wall.
The little lion was mold No 1097-S and Athena was mold No 1108

Here below is a photo of one of mine taken around 1980:

Now here’s where I decided to play detective to find several other buildings with the very same ornaments on them, I discovered 522-524 were designed in 1901 by architect G. F. Pelham and they were owned by Jacob Kassewitz, I found that Kassewitz owned other buildings and that he used the same architect for all of them. On a hunch I street viewed each of the four buildings, starting with 237-241 E 53rd st which I knew about before, this pair was built in 1900 and cost $58,000 to build, the square grotesques number eight, Athena also numbers eight, and the little lion head which is very hard to see numbers sixteen across the two top floors:

Next I checked 229 E 11th st, also built in 1901 and it cost $28,500, this building is a singleton, it has four lion heads on the top floor, six Athena keystones over two floors, and four square grotesques:

Next I went to 119 W 15th st, also built in 1901 for the same cost as 229 was, this building has four square grotesques, four Athenas and four lion heads:

Lastly, I went to Mr Kassewitz’s fourth building, located at 9 Spring st., built also in 1901 but which cost $30,000 to build, this one like the other singletons has four square grotesques, four Athenas and four lion heads:

Done with Mr Kassewitz I turned my attention to 522-524 E 12th st. (actually 518 through 524 are shown in the archives), and while the buildings were demolished in the 1980s, their record still appears as having been built in 1901 over four lots at a cost of $112,000 for the 7 story brick buildings. The row of four tenements was a massive undertaking which fronted 100 feet along 12th street’ South side, the owner of these buildings however was Samuel Brasch. The odd thing is, only 522 and 524 were of the same style with the Athenas and Square grotesques, the other two buildings (518 and 520 to the East) were totally different, I suspect there is an error in the archive and that 518 and 520 did not belong, or there could be other explanations such as they were under construction and Brasche bought them and the adjacent two lots, finished the two under construction and had the other two built.
Across the two buildings there were an amazing fourty Athena keystones and eight square grotesques:

Now I also know there was another “Athena building” on East 106th st, 308 and I believe 306- another pair, neither building appears in the archive which unfortunately starts in 1900, that could be an omission or it could mean they were built just before 1900, they had eight Athenas, eight square grotesques and eight lion heads, here’s the buildings being demolished around 1977:

Here’s the little lion and Anthena I have been talking about:


Next I went to look at G.F Pelham, he was a prolific architect whose career spanned decades, he literally was designing buildings all over Manhattan at least- from the 1890s well into the 1920s and later, he has over 1000 buildings to his credit.
So far where are we numbers wise on these? I counted 70 Athena keystones, 36 sq grotesques and 36 lion head keystones and I know there are more buildings with these on them among Pelham’s 1000 entries. I know I’ll do a little more searching and see what comes up for 1900 thru 1905 to narrow it down. Pelham seemed to use this particular set of ornaments on a number of buildings, no doubt he kept a portfolio he showed prospects what they could have as a “stock” design off the shelf for the lowest price instead of custom designing a facade from scratch, no doubt this design was among the pages of that portfolio and that it was popular.
From a recent photo of the demolition of a 1917 church on Avenue A and 11th street in NYC, clearly no one has bothered to save even these;

I removed the four lion blocks from the kiln, all four turned out perfectly on the new kiln schedule, but the cherub plaque still had his face blown off.
Here’s a photo of two lions on my bookshelf as bookends.

The kiln shut off just about the time I figured on after 24 hours and 20 minutes. I watched it just hit 2061 degrees and then it went to the 10 minute hold.
I was able to calculate the temp rise in the last stage of 80deg/hour to be 1.333 degs per minute and the Bartlett controller kept it just about dead on, and shut off almost to the minute I had calculated while I was waiting for it to shut off.
I saved the firing profile as user 6 to use again as-is if the load turns out fine.
I set the timer clock on the vent fan to turn off in about an hour, so tomorrow afternoon I should be able to open it up and see what I have, hopefully I won’t have four shattered lion faces staring up accusingly at me from the bottom of the kiln!
The program I came up with was 7 stages and started off with a 6 hour preheat @ 200 degrees F with a temperature rise of 60 degrees per hour, so it took about 2 hours to get to 200 degrees.
Then it continued with segments 2 through 7:
S2- 80 deg/hour to 280 deg
S3- 100 deg/hour to 550 deg
S4- 80 deg/hour to 750 deg
S5- 150 deg/hour to 1100 deg
S6- 180 deg/hour to 1700 deg
S7- 80 deg/hour to 2060 deg with a 10 minute hold @ 2060 deg.
Total time: 24:20
Here’s what I programmed in the kiln controller for another round of torture tests, and yes, it’s a form of torture to open a kiln lid, look inside and see your work ruined:
Segment / Temp rise per hour/ Temp in degrees F
That make it about a 24 hour firing plus the cooling down.